")
The first time I cooked a rump cap roast—better known as picanha in Brazil—I didn’t expect to fall completely in love with a single cut of beef. But there I was, in my tiny kitchen, staring at this beautifully marbled triangular roast with its thick, creamy-white fat cap, wondering why it took me this long to try it at home.
There’s something kind of magical about picanha. When that fat cap starts to melt, you get this deep, buttery aroma that fills the whole house. It’s the kind of smell that makes people peek into the kitchen with that look of “Is dinner ready yet?”
What really surprised me was how simple the whole process was. No complicated rubs or fancy tricks. Just salt, pepper, maybe garlic if you’re feeling bold—and the oven does the rest. It’s almost laughably easy for how impressive the final result looks.
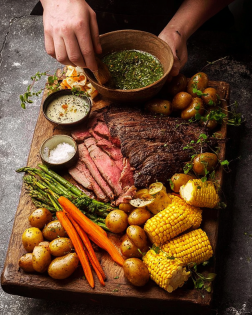
I vividly remember slicing into my very first roast. The knife slid through like warm butter. Tender, juicy pink meat with that rendered fat edge… it was one of those quiet moments where you pause and think, Yes. This is what cooking joy feels like.
This recipe became my fallback for everything—Sunday dinners, holidays, even “just because” nights. The best part is how forgiving the cut is. Even if you’re not a steak expert, you’ll pull off something restaurant-worthy.
So today, I want to walk you through my go-to method—simple, juicy, deeply flavorful, and perfect whether you’re cooking your first rump cap roast or your fiftieth.
Recipe Resume (Quick Selling Points)
Unbelievably tender with minimal effort.
Fat cap self-bastes the meat—no babysitting needed.
A Brazilian classic made easy for home cooks.
Only simple pantry ingredients required.
Impress-your-guests level flavor in under 90 minutes.
Oven-friendly—no grill required.
Perfect for special dinners or weekly meal prep.
Leftovers taste just as incredible sliced thin for sandwiches.
Why This Rump Cap Roast (Picanha) Is The Only One You’ll Ever Need
Cuisine: Brazilian-Inspired
This recipe became a staple after a family dinner where I accidentally over-invited people (classic me). I needed something quick, impressive, and nearly foolproof. My friend—who grew up in Rio—suggested picanha.
I’ll never forget his face when he tried the first slice. He closed his eyes, nodded slowly, and said, “Yep… this tastes like home.” From that moment, picanha became my special-occasion signature dish.
What You Really Need to Make This Amazing Rump Cap Roast (Simplified)
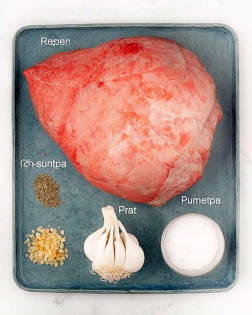
1 whole rump cap / picanha (2–3 lbs), fat cap on
2–3 tsp coarse salt
1 tsp black pepper
1 tsp garlic powder (optional)
Olive oil (just a tiny drizzle)
How to Master the Perfect Slow-Cooker Chicken Cordon Bleu Dip (My Secret Method)
Start by placing the roast fat-side up on your board. I like to score the fat in shallow crosshatch lines—it helps the fat render beautifully. Drizzle just a whisper of olive oil and rub it in, then season generously with salt, pepper, and garlic powder if you’re using it.
Now here’s the trick: cook it low and slow first, then finish with high heat. Place the roast fat-side up in a cast iron skillet or roasting pan and bake at 275°F (135°C) for 45–60 minutes, depending on thickness. You’re looking for about 120–125°F internal temp for medium-rare.
Once it hits that sweet spot, crank the heat to 450°F (230°C) or switch to broil. This is where the magic happens—the fat cap crisps, bubbles, and turns golden and irresistible. Let it rest at least 10–15 minutes before slicing against the grain.
Chef’s Notes and Tips For a Flawless Rump Cap
Letting the roast rest is nonnegotiable—the juices settle and the meat relaxes, giving you the tender slices you dream about.
Also, don’t trim the fat cap. It’s the heart of this recipe. It melts down slowly, basting the meat naturally and giving you that signature picanha flavor.
Get Creative! Easy Substitutions and Fun Variations
Swap garlic powder for smoked paprika for a richer, wood-fired vibe.
Add a chimichurri drizzle on top—it’s incredible with the beefy richness.
Slice leftovers thin for sandwiches, tacos, or steak salads.
Lighten It Up! Simple Swaps for a Healthier Rump Cap Roast
You can trim the fat cap slightly before cooking if needed, though I recommend leaving at least half for moisture.
Serve it with roasted vegetables or simple cauliflower mash instead of potatoes for a low-carb plate.
And there you have it!
A juicy, buttery, deeply satisfying Rump Cap Roast (Picanha) that brings restaurant flavor straight into your kitchen—without fuss. Don’t forget to let us know how your roast turns out, and browse our other delicious recipes while you’re here!
Recipe FAQs
1. What’s the best way to cook rump cap roast (picanha) in the oven?
The best method is a low-and-slow roast followed by a high-heat finish. This technique helps the fat cap render gradually, keeping the meat juicy, while the final blast of heat crisps the top. Many home cooks rush the process, but giving the roast time to warm internally ensures tenderness. The key is slicing against the grain—picanha has long fibers that soften beautifully with proper slicing.
2. Should I trim the fat cap when preparing a Brazilian picanha roast?
Traditionally, no. The fat cap is what gives picanha its signature flavor and buttery texture. As it melts, it bastes the meat naturally. You can score the fat to help rendering, but avoid removing more than necessary. Even if you’re aiming for a lighter version, leave a thin layer for moisture and browning.
3. What’s the ideal internal temperature for tender rump cap roast?
For classic Brazilian-style picanha, aim for medium-rare—about 125°F (52°C) before resting. The temperature will rise 5–10°F as it rests. Cooking beyond medium tends to reduce the tenderness of this cut, though some enjoy medium-well. A meat thermometer really is your best friend here.
4. Can I cook picanha on the grill instead of the oven?
Absolutely. Outdoor grilling gives the fat cap a smoky, irresistible char. Grill it over indirect heat first, then finish directly over the flames for a crisp top. Brazilian churrasco restaurants use giant skewers, but at home, a simple two-zone grill setup works wonderfully.
5. What side dishes pair best with rump cap roast?
Garlic rice, roasted potatoes, buttered corn, or even fresh chimichurri brighten the rich beef. For a lighter plate, pair it with grilled vegetables or a crisp salad. This cut is bold and beefy, so sides with acidity or freshness help balance the richness.
6. Can I marinate the roast before cooking?
You can, but it’s not traditional. Picanha shines with simple seasoning because the fat cap adds so much flavor naturally. If you do marinate, keep it mild—olive oil, garlic, a splash of lemon—and no more than 1–2 hours.
7. How do I slice picanha properly?
Always slice against the grain. The grain usually runs lengthwise across the roast, so you’ll want to rotate the meat slightly to find that perfect angle. Thin slices keep the texture buttery and tender.

Rump Cap Roast (Picanha)
4
servings30
minutes40
minutes300
kcalIngredients
1 whole rump cap / picanha (2–3 lbs), fat cap on
2 –3 tsp coarse salt
1 tsp black pepper
1 tsp garlic powder (optional)
Olive oil (just a tiny drizzle)
Directions
- Start by placing the roast fat-side up on your board. I like to score the fat in shallow crosshatch lines—it helps the fat render beautifully. Drizzle just a whisper of olive oil and rub it in, then season generously with salt, pepper, and garlic powder if you’re using it.
- Now here’s the trick: cook it low and slow first, then finish with high heat. Place the roast fat-side up in a cast iron skillet or roasting pan and bake at 275°F (135°C) for 45–60 minutes, depending on thickness. You’re looking for about 120–125°F internal temp for medium-rare.
- Once it hits that sweet spot, crank the heat to 450°F (230°C) or switch to broil. This is where the magic happens—the fat cap crisps, bubbles, and turns golden and irresistible. Let it rest at least 10–15 minutes before slicing against the grain.